2.11 Enable key archiving
If MyID is configured to use an HSM, and the HSM supports key export, any archived keys will be generated on the HSM.
Additional configuration is required for the CA to support key archiving. If you do not require the key archive functionality, you may skip this section.
To request a certificate that is configured for key archival through MyID, the MyID application server must have access to download the CRL (Certificate Revocation List) for the issuing CA and all parent CAs when the certificate is requested.
-
If the MyID application server is in the same domain as the CA, it should automatically be able to download the CRL.
-
If the MyID application server is not in the same domain as the CA, the CA may need configuring to publish the CRL to an additional location that is accessible from the MyID server.
Note: If your MyID system has been upgraded from a pre-8.0 SR1 system, the MyID client card issuance station must also have access to download the CRL.
Warning: One of the KRA private keys that were configured at the time the key to be recovered was issued must be available (along with its corresponding KRA certificate) to decrypt, and hence recover, the user’s private key.
2.11.1 Additional MyID application servers
If you replace or add additional MyID application servers, the new server must have access to suitable KRA certificates and private keys.
When you obtain the KRA certificates, you need a backup strategy to account for this future possibility.
If KRA are stored in software, the private key can be made exportable, and the certificate/private key exported to a password protected PFX file. This allows the subsequent import of the KRA onto new application servers. Due to the sensitive nature of the KRA, additional protection must be given to this PFX and associated password; for example, store the PFX and password in a safe.
If the KRA private keys are stored in an HSM, the private key will not be exportable, and a different backup strategy, specific to the HSM, is required to ensure the KRA private key is fully protected.
2.11.2 Key Recovery Agent certificate requirements
To check your template is configured correctly:
- In the MMC Snap-in for managing Certificate Templates for Microsoft CA, select properties for the KRA template.
- On the Cryptography tab, set the Provider Category to Legacy Cryptographic Service Provider (for CSP) or Key Storage Provider (for CNG/KSP).
2.11.3 Publishing the Key Recovery Agent (KRA) certificate
For MyID to manage key archival and recovery, the KRA certificate must be published and the MyID COM+ user account must have enrollment privileges for it.
- Start the Certification Authority application.
-
Open the current CA.
-
Right-click Certificate Templates and select Manage from the menu.
This will start the Certificate Template application.
- Right-click the Key Recovery Agent Certificate and select Properties from the menu.
-
-
The Key Recovery Agent Certificate Properties dialog box is displayed.
- Click the Security tab
- Click Add and add the MyID COM+ user account. Ensure it has Read and Enroll permissions.
- Click OK.
-
In the Certification Authority application, expand the current CA.
- Right-click Certificate Templates and select New from the menu.
- Click Certificate Template To Issue and select the Key Recovery Agent Certificate.
2.11.4 Obtaining the Key Recovery Agent (KRA) certificate
2.11.4.1 Requesting the Key Recovery Agent certificate(s)
- Log on to the MyID application server using the MyID COM+ user account.
- Run the certmgr.msc snapin.
- Expand Certificates – Current User > Personal.
- Right-click the Personal folder, then from the pop-up menu select All Tasks > Request New Certificate.
- Click Next, then click Next again.
- Select the Key Recovery Agent certificate and click the down arrow next to Details.
- Click Properties.
- Click the Certification Authority tab.
- Deselect the certificate authorities you do not want to use then click OK.
- Click Enroll.
- When the certificate request has completed, click Finish.
2.11.4.2 Approving the KRA request
- Log on to the CA as the domain administrator.
- Run the Certification Authority MMC console.
-
In the Pending Requests folder, right-click the KRA certificate, then from the popup menu select All Tasks > Issue.
The certificate is issued and moved to the Issued Certificates folder.
- In the Issued Certificates folder, double-click the KRA certificate.
- Click the Details tab, then click Copy to File.
- In the Certificate Export Wizard, click Next.
- Ensure that the DER encoded binary X.509 (.CER) option is selected, then click Next.
- Enter a filename and location, then click Next.
- Click Finish.
- Click OK.
- Locate the file you exported then copy it to a location where you can access it using the MyID COM+ user.
2.11.4.3 Importing the KRA certificate
-
Log on to the MyID application server using the MyID COM+ user account.
-
Right-click the exported KRA certificate then from the pop-up menu select Install Certificate.
-
Follow the on-screen prompts and install the certificate to the Current User location.
Note: Make sure that you choose the option to place all certificates in the Personal store when asked.
You can now proceed to section 2.11.5, Enable key archiving and load the KRA certificate into the CA.
2.11.5 Enable key archiving and load the KRA certificate into the CA
-
On the machine hosting the CA, run the Certification Authority MMC console.
To do this, you must have ‘Certificate Manager’ access rights.
-
Select the CA node. Right-click it and select Properties from the menu.
-
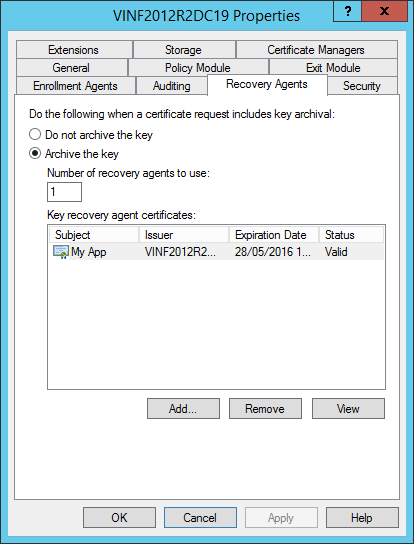
Click the Recovery Agents tab.

Note: If you have invalid certificates in this list, you are recommended to remove them before continuing.
- Click Archive the key to enable key archiving for this CA.
-
The Number of recovery agent certificates to use indicates how many entries will actually be selected from the list of KRA certificates available in the list. If there are more KRA certificates in the list than the number to be used, they will be randomly selected. The simplest scenario is to have the Number of recovery agents to use equal to the number of KRA certificates in the list.
Note: If you do not have the Number of recovery agents to use equal to the number of KRA certificates in the list (for example, if you have 17 KRA certificates, and the Number of recovery agents to use option is 15) you will experience problems when the KRA certificate you require is not included in the arbitrary list of 15 certificates. A card issuance will appear to have completed successfully, but the System Events workflow will list an error similar to:
2009-10-02 11:53:20 VMSANDPIT EdeficeBOL BOL Caught Exception in Function RecoverKey, Error Description BOL ComException catch handler for function : RecoverKey
Unspecified error
Error Recovering Key from Microsoft KeyStore - Error decrypting key data - KRA Private Key Not Available
0x8009200c - Cannot find the certificate and private key to use for decryption.
(std), Error Number 0x80004005 -
To add a KRA certificate to the list:
- Click Add.
-
Select the KRA certificate that was issued previously.
This should now appear in the list on the Recovery Agents page.
You can add as many KRA certificates as you need. Every time a certificate request that includes key archiving is submitted to this CA, potentially all KRA certificates in the list will be given the ability to recover the key at a later date.
- Click Apply. Certificate services will be restarted.
2.11.6 Define certificate templates that support key archival
Microsoft Windows CA does not ship with certificate templates that support key archival. These must be created.
-
On the CA, start either:
-
The Certificate Templates MMC console.
-
The Certification Authority application.
-
- Open the current CA, right-click Certificate Templates and choose Manage.
-
Select a template that is similar to the template that is to be created.
Right-click this template and select Duplicate Template from the list.
Note: If your account does not have include permissions to create and modify certificate templates, then the option will not be displayed.
This will create a new template that is identical to the selected template, which can be customized as required.
-
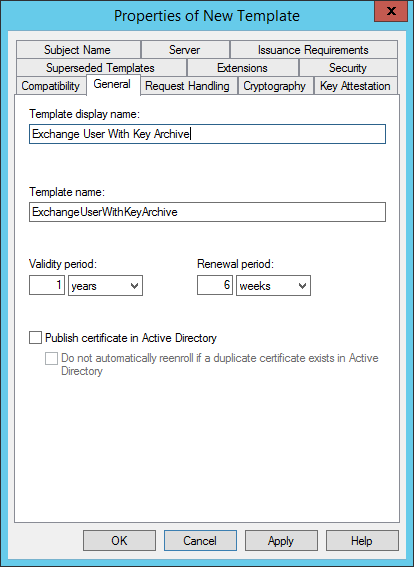
Right-click the new template and select Properties from the menu.
-
On the General page, enter a name for the new template.

-
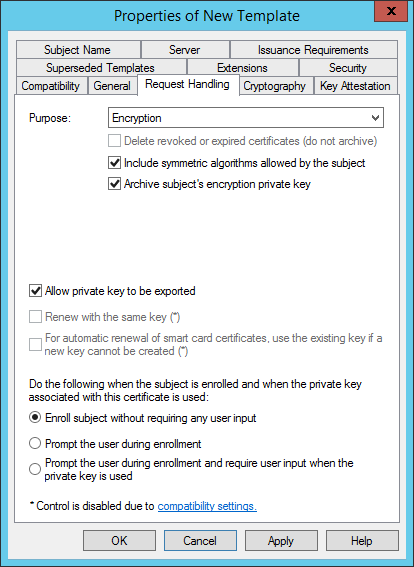
On the Request Handling page, click the Archive subject’s encryption private key check box to specify this template for key archival, then click OK on the message box.
Note: This should only be enabled for encryption certificates – never for signing certificates.
-
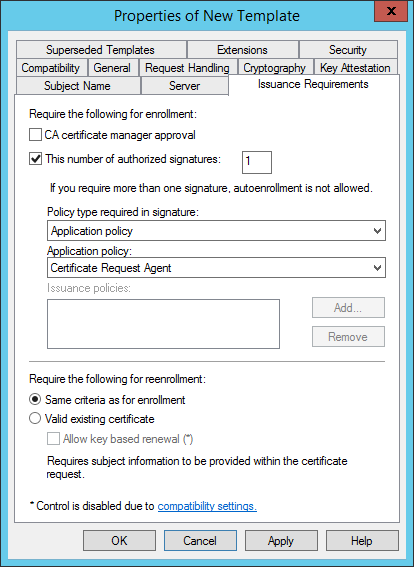
On the Issuance Requirements page:
- Click the This number of authorized signatures box to select it.
- Enter the digit 1 into the box.
The signature of an enrollment agent will be required to issue a certificate of this template type.
Set up any other parameters necessary for your environment, referring to the Microsoft documentation for further details.

-
- On the Security page, click Add and add the MyID COM+ user account. Ensure it has Read, Write and Enroll permissions.
-
Click OK to save the template.
The template is now saved to the Active Directory store but is not available for issuance yet.